This is a repost from this article
I recently created a large number of Hyper-V virtual machines as a part of an educational video series that I am about to produce. During the process of shuffling some resources around, I discovered an odd permissions problem related to Hyper-V virtual hard disks in Windows Server 2016. In this article, I want to show you why this problem occurs, and how to fix the problem.
The issue in question pertains to virtual machine portability. We all know that virtual machines can be live migrated, imported and exported. That’s not the issue. Instead, the issue occurs when you begin moving around virtual hard disk files.
As previously mentioned, I had to create a huge number of virtual machines for an upcoming project. Since some of the virtual machine configurations were rather complex, I would occasionally power down the virtual machine and make an offline copy just in case something went wrong.
Eventually, I wrapped up the project, and deleted the virtual machines because I no longer needed them. The next day, however, I realized that I needed to go back and look at something on one of the VMs. I had started working on an unrelated project, and decided that it would be easier to use one of my old lab VMs rather than creating a new VM.
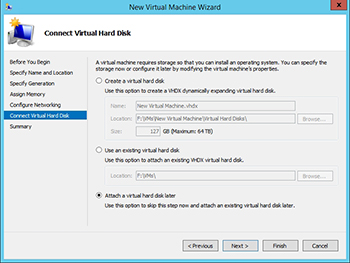
I powered up a Hyper-V host and worked through the New Virtual Machine Wizard. In doing so, I tried to build a new VM with a hardware configuration that was identical to the VM that I had prematurely deleted. When I got to the wizard’s Connect Virtual Hard Disk screen, I used the option to attach a virtual hard disk later. You can see what this option looks like in Figure 1.
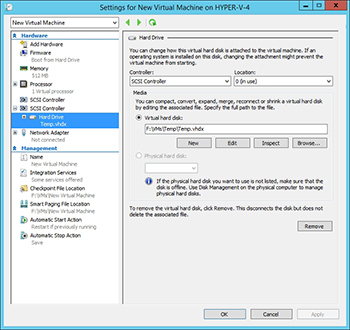
Once the virtual machine had been created, I copied the previously existing virtual hard disk from my offline copy into the new virtual machine’s folder on the Hyper-V server. I then went into the virtual machine settings and used the Add Hardware wizard to add a SCSI controller to the virtual machine and attached my recently copied virtual hard disk file, as shown in Figure 2. I also modified the Firmware settings so that the VM would boot from the virtual hard disk.
I should point out that the steps that I have outlined so far were not anything new for me. I have performed similar operations many times over the years, without issue. Once I powered up the virtual machine, however, I received the error message shown in Figure 3.
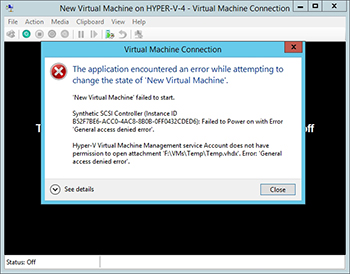
If you read through the error message, you can see that this is a General Access Denied error. The error essentially means that Hyper-V does not have permission to access the virtual hard disk.
So what went wrong? If I am to be completely honest with you, then I have to admit that I don’t know for sure what caused the problem. I suspect that I created the VM on a different Hyper-V host from the one on which the virtual hard disk file originated. In any case, I can show you how to fix the problem.
Let me show you the permissions for two different virtual hard disks. The virtual hard disk shown in Figure 4 is healthy. The virtual hard disk shown in Figure 5 is the one that is causing the error. Do you see the difference?
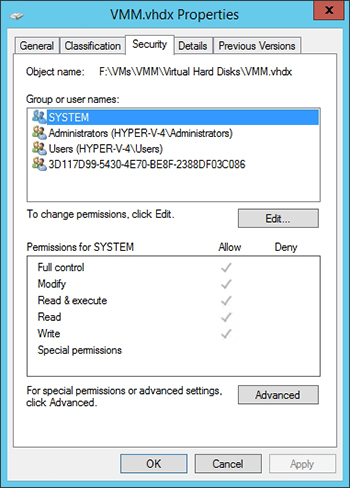
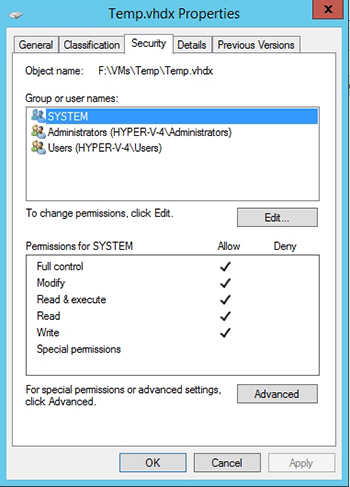
The reason why the error is happening is because every Hyper-V virtual machine has a unique security identifier (SID), and that SID must be granted permission to the virtual hard disk.
There are two ways to fix the problem. The easy (but completely insecure) fix is to give Everyone full control of the virtual hard disk file. The “correct” fix it to give read and write access to the virtual machine’s SID.
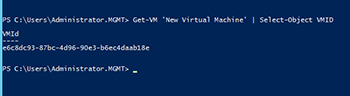
You can find the virtual machine’s SID by using the Get-VM cmdlet in PowerShell. For a VM named New Virtual Machine the command would be:
Get-VM 'New Virtual Machine' | Select-Object VMID
You can see what this looks like in Figure 6.
To fix the problem, you will need to use the icacls command. Figure 7 shows the command in use. Note that there is no space between the SID and the colon. It should go without saying, but it’s a good idea to use copy and paste to avoid retyping the SID.
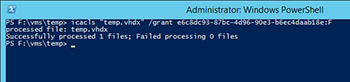
Now, the virtual machine should start without issue.
