This article was originally posted here.
Hello World,
If you are following us, you probably remember that we wrote already a post about this topic (see Ubuntu 14.10 – Configure your sytem to have x11vnc running at startup).
Since Ubuntu 15.04 is using systemd, the instructions found in the
previous post are not applicable anymore. Some of our readers had
issues after upgrading to Ubuntu 15.04. The x11VNC is not running at
startup anymore.
This post will provide the necessary information to have x11vnc running at startup on ubuntu 15.04 when systemd is used.
Our Goal !
At the end of this post, you should be able to connect via vnc to
your Ubuntu machine even if there is a reboot and even if no user are
logged into the machine. This configuration should display the login
screen via vnc viewer client you are using.
We didn’t invent anything here. All the
information provided here are based on the information made available
at this location : https://help.ubuntu.com/community/VNC/Servers#Have_x11vnc_start_automatically_via_systemd_in_any_environment_.28Vivid.2B-.29
Installing x11vnc server
In this post, we have decided to use the
x11vnc server package to provide vnc capabilities. The installation
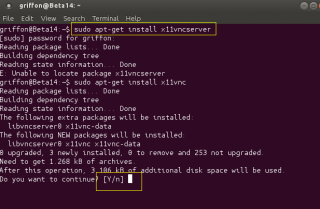
process is quite straight forward. Log into your ubuntu 15.04 machine,
open the terminal console and issue the following command :
sudo apt-get install x11vnc
Click on Picture for Better Resolution
To have a minimum of security, we will protect the vnc connection via
a password. The password will be stored in a file. To create this
file, you will need to issue the following command
sudo x11vnc –storepasswd /etc/x11vnc.pass
You will be asked to enter a password. Enter the password and confirm your choice and you should be good to go
Click on Picture for Better Resolution
Create the Service Unit file
So far, we have just issued standard command related to the x11vnc
package. We need to create the service unit file for our x11vnc
service. To do this, we will issue the following command :
sudo nano /lib/systemd/system/x11vnc.service
This file should content the following lines
[Unit]
Description=Start x11vnc at startup.
After=multi-user.target
[Service] Type=simple ExecStart=/usr/bin/x11vnc -auth guess -forever -loop -noxdamage -repeat -rfbauth /etc/x11vnc.pass -rfbport 5900 -shared[Install] WantedBy=multi-user.target
Save the file
Configure Systemd
It’s time to issue the command to have systemd aware of the change
and make the service running at startup. In a command prompt, you will
issue the following command :
sudo systemctl daemon-reload
sudo systemctl enable x11vnc.service
Restart the system and do not login. We will check if this is working…..
Testing the solution !
To check that you can indeed perform a vnc connection to your Ubuntu
Machine, you will try to connect to it using your favourite vncviewer
(we are using TigerVnc) while nobody is connected and just after a
reboot of the machine.
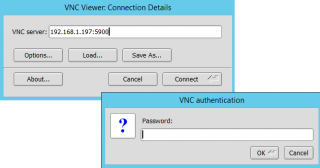
In the vncviewer, you will provide the
ip address or hostname of the machine to connect and the port to be
used. In our example, he port used is 5900. If you have set a password to protect your vnc connection, you will be prompted for a password as well.
Click on Picture for Better Resolution
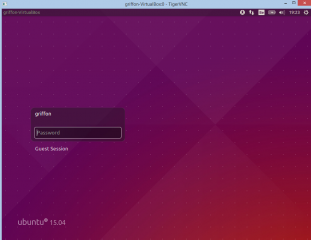
If everything is ok, you should see the Ubutun login page displayed inside your vncviewer
Click on Picture for Better Resolution
Final Notes
And voila ! We have sucessfully updated
the instructions on how to have x11vnc run at startup. As you can see,
since Ubuntu 15.04 is using the Systemd solution, we need to create our
service unit files (x11vnc.service) and register them with systemctl
and we are done.
Pff… the last days I have updated some
of the most popular posts about xrdp, x11vnc and ubuntu 15.04… It’s time
for me to take a break…
Till next time


